(Update: Saturday, April 28, 2012)
Data Recovery is scareware masquerading as computer repair and optimization program. It pretends to scan your computer for hard drive, RAM and Windows registry errors and displays fake warnings. None of this is really surprising, or at least it shouldn't because it's a typical
scareware. Cyber crooks behind Data Recovery just want to trick as many internet users as possible into paying for bogus computer repair program. This scareware is usually installed by the user when visiting infected/malicious websites or opening infected attachments. Malware authors use social engineering and drive-by downloads to distribute this malicious software too. Once installed, you may be requested to pay to fix supposedly detected critical hard drive errors and RAM failures. Just ignore those fake warnings and notifications about non-existent problems and uninstall Data Recovery from your computer. Of course, it's easier said than done, so to remove this malware from your computer, please follow the removal instructions below.
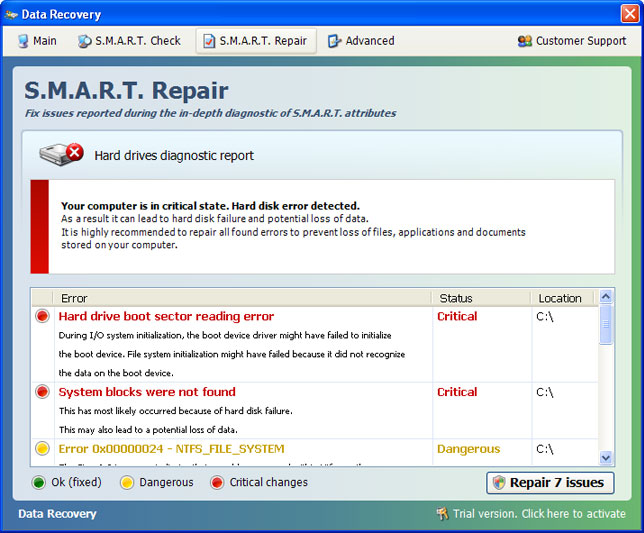
Data Recovery 2012 GUI:
Old GUI:
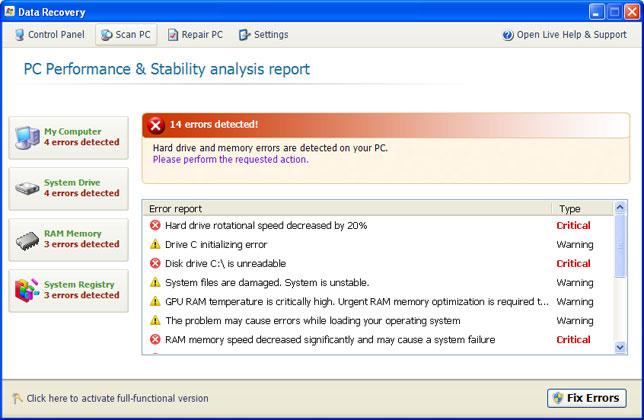
When running, Data Recovery will report the following problems on your computer:
- Hard drive rotational speed decreased by 20%
- Drive C initializing error
- Disk drive C:\ is unreadable
- System files are damaged. System is unstable
- GPU RAM temperature is critically high
- The problem may cause errors while loading your operating system
- RAM memory speed decreased significantly and may cause a system failure
- and many more...
It detects 14 errors on each infected computer. It doesn't matter whether is a brand new PC or and old laptop. All the errors and warnings are predetermined, so don't get spooked. Data Recovery is more annoying than dangerous, however, there's one this that shouldn't be overlooked. The rogue program hides certain files, usually shortcuts and Desktop icons, and moves other files to Windows
%Temp%\smtmp folder.

Do not delete any files from your Temp folder; otherwise you'll have to use Windows CD/DVD to restore your system. Thankfully, you can unhide your files rather easily. Just follow the removal instructions below. It is also worth mentioning that Data Recovery executable drops a rootkit from the
TDSS family. If you don't remove the rookit the rogue application will be re-installed.
Fake Data Recovery warnings:
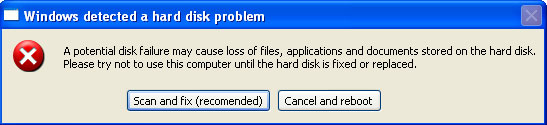
Windows detected a hard disk problem A potential disk failure may coss loss of files, applications and documents stored on the hard disk. Please try not to use this computer until the hard disk is fixed or replaced.
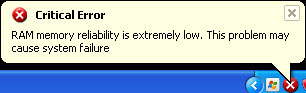
Critical Error RAM memory reliability is extremely low. This problem may cause system failure
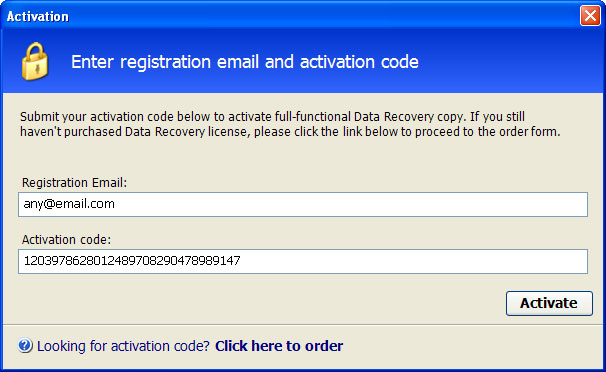
Additionally, you can activate the rogue program by entering this registration code
15801587234612645205224631045976 08869246386344953972969146034087and any email as shown in the image below. Once this is done, you are free to install anti-malware software and remove the rogue anti-virus program from your computer properly.
That's probably the most easiest way to remove Data Recovery malware: enter the code and then run a full system scan with recommended
anti-malware software (direct download). You can also remove malicious files manually. One way or another, please follow the steps in the removal guide below. And of you have already purchased this bogus computer repair program, please contact your credit card company immediately and dispute the charges. Next time purchase software from reputable vendors only and keep it up to date. If you need help removing Data Recovery, please leave a comment below or email us. Good luck and be safe online!
Related malware:
Quick removal:1. Use debugged registration key and fake email to register Data Recovery malware. This will allow you to download and run any malware removal tool you like and restore hidden files and shortcuts. Choose to activate "Data Recovery" manually and enter the following email and activation code:
mail@mail.com
08869246386344953972969146034087 (
new code!)
mail@mail.com
1203978628012489708290478989147 (old code, may not work anymore)
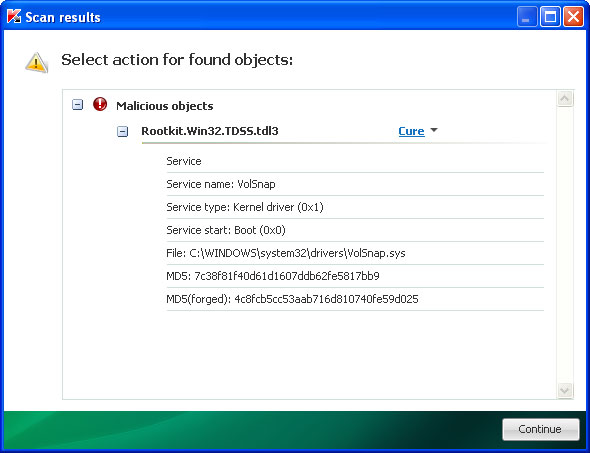
2. Download
TDSSKiller and run a system scan. Remove found rootkits as shown in the image below. Reboot your computer if required.
3. Download recommended
anti-malware software (direct download) and run a full system scan to remove this virus from your computer.
Alternate Data Recovery removal instructions:1. First of all, you need to unhide the files and folders. Select
Run... from the
Start Menu or just hit the key combination
CTRL+R on your keyboard. In the
Open: field, enter
cmd and hit Enter or click OK.
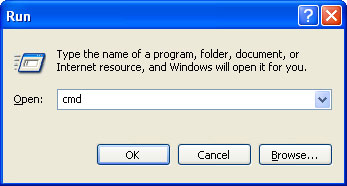
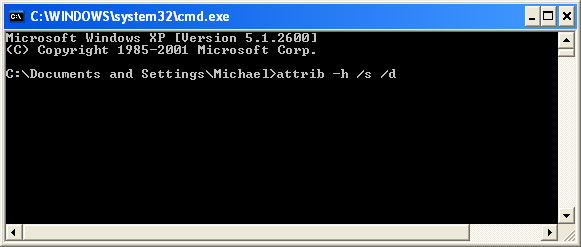
At the command prompt, enter
attrib -h /s /d and hit Enter. Now, you should see all your files and folders. NOTE: you may have to repeat this step because the malware may hide your files again.

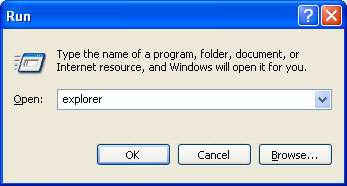
If you still can't see any of your files, Select
Run... from the
Start Menu or just hit the key combination
CTRL+R on your keyboard. In the
Open: field, enter
explorer and hit Enter or click OK.
2. Open Internet Explorer. Select
Run... from the
Start Menu or just hit the key combination
CTRL+R on your keyboard. In the
Open: field, enter
iexplore.exe and hit Enter or click OK.
Open Internet Explorer and download
TDSSKiller or Backdoor.Tidserv Removal Tool. This malware usually (but not always) comes bundled with TDSS rootkit. Removing this rootkit from your computer is very important (if exists). Run TDSSKiller or
Backdoor.Tidserv Removal Tool to remove the rootkit.
3. Finally, download recommended
anti-malware software (direct download) to remove this virus from your computer.
NOTE: in some cases the rogue program may block anti-malware software. Before saving the selected program onto your computer, you may have to rename the installer to
iexplore.exe or
winlogon.exe With all of these tools, if running Windows 7 or Vista they MUST be run as administrator. Launch the program and follow the prompts. Don't forget to update the installed program before scanning.
Alertane Data Recovery removal instructions:1. First of all, you need to unhide the files and folders. Select
Run... from the
Start Menu or just hit the key combination
CTRL+R on your keyboard. In the
Open: field, enter
cmd and hit Enter or click OK.
At the command prompt, enter
attrib -h /s /d and hit Enter. Now, you should see all your files and folders. NOTE: you may have to repeat this step because the malware may hide your files again.
2. The rogue application places an icon or your desktop. Right click on the icon, click
Properties in the drop-down menu, then click the
Shortcut tab.
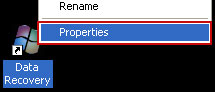
The location of the malware is in the
Target box.
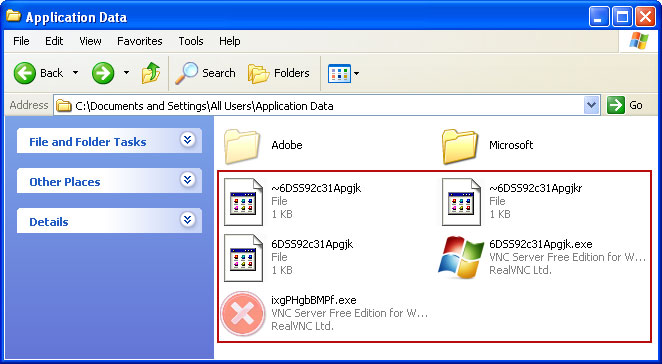
 On computers running Windows XP, malware hides in:
C:\Documents and Settings\All Users\Application Data\
NOTE: by default, Application Data folder is hidden. Malware files are hidden as well. To see hidden files and folders, please read
Show Hidden Files and Folders in Windows.
Under the Hidden files and folders section, click
Show hidden files and folders, and remove the checkmark from the checkbox labeled:
- Hide extensions for known file types- Hide protected operating system filesClick OK to save the changes. Now you will be able to see all files and folders in the Application Data directory.
On computers running Windows Vista/7, malware hides in:C:\ProgramData\
3. Look for suspect
".exe" files in the given directories depending on the Windows version you have.
Example Windows XP:C:\Documents and Settings\All Users\Application Data\6DSS92c31Apgjk.exe
C:\Documents and Settings\All Users\Application Data\ixgPHgbBMPf.exe
Example Windows Vista/7:C:\ProgramData\6DSS92c31Apgjk.exe
C:\ProgramData\ixgPHgbBMPf.exe
Basically, there will be a couple of
".exe" file named with a series of numbers or letters.
Rename those files to 6DSS92c31Apgjk.vir, ixgPHgbBMPf.vir etc. For example:
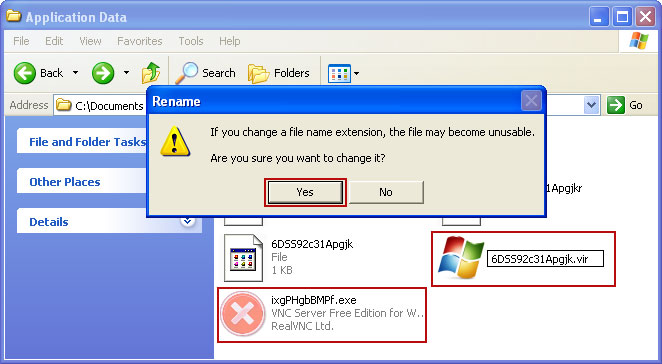
It should be:
C:\Documents and Settings\All Users\Application Data\6DSS92c31Apgjk.virInstead of:
C:\Documents and Settings\All Users\Application Data\6DSS92c31Apgjk.exe4. Restart your computer. The malware should be inactive after the restart.
5. Open Internet Explorer and download
TDSSKiller or
Backdoor.Tidserv Removal Tool. This malware usually (but not always) comes bundled with TDSS rootkit. Removing this rootkit from your computer is very important (if exists). Run TDSSKiller and remove the rootkit.
6. Download recommended
anti-malware software (direct download) to remove this virus from your computer
NOTE: in some cases the rogue program may block anti-malware software. Before saving the selected program onto your computer, you may have to rename the installer to
iexplore.exe or
winlogon.exe With all of these tools, if running Windows 7 or Vista they MUST be run as administrator. Launch the program and follow the prompts. Don't forget to update the installed program before scanning.
Associated Data Recovery files and registry values:Files:
Windows XP:
- %AllUsersProfile%\Application Data\[SET OF RANDOM CHARACTERS]
- %AllUsersProfile%\Application Data\[SET OF RANDOM CHARACTERS].exe
- %UsersProfile%\Desktop\Data Recovery.lnk
- %UsersProfile%\Start Menu\Programs\Data Recovery\
- %UsersProfile%\Start Menu\Programs\Data Recovery\Data Recovery.lnk
- %UsersProfile%\Start Menu\Programs\Data Recovery\Uninstall Data Recovery.lnk
%AllUsersProfile% refers to: C:\Documents and Settings\All Users
%UserProfile% refers to: C:\Documents and Settings\[User Name]
Windows Vista/7:
- %AllUsersProfile%\[SET OF RANDOM CHARACTERS]
- %AllUsersProfile%\[SET OF RANDOM CHARACTERS].exe
- %UsersProfile%\Desktop\Data Recovery.lnk
- %UsersProfile%\Start Menu\Programs\Data Recovery\
- %UsersProfile%\Start Menu\Programs\Data Recovery\Data Recovery.lnk
- %UsersProfile%\Start Menu\Programs\Data Recovery\Uninstall Data Recovery.lnk
%AllUsersProfile% refers to: C:\ProgramData
%UserProfile% refers to: C:\Users\[User Name]
Registry values:
- HKEY_CURRENT_USER\Software\Microsoft\Windows\CurrentVersion\Run "[SET OF RANDOM CHARACTERS].exe"
- HKEY_CURRENT_USER\Software\Microsoft\Windows\CurrentVersion\Run "[SET OF RANDOM CHARACTERS]"
- HKEY_CURRENT_USER\Software\Microsoft\Windows\CurrentVersion\Policies\Associations "LowRiskFileTypes" = '/{hq:/s`s:/ogn:/uyu:/dyd:/c`u:/bnl:/ble:/sdf:/lrh:/iul:/iulm:/fhg:/clq:/kqf:/`wh:/lqf:/lqdf:/lnw:/lq2:/l2t:/v`w:/rbs:'
- HKEY_CURRENT_USER\Software\Microsoft\Windows\CurrentVersion\Policies\Attachments "SaveZoneInformation" = '1'
- HKEY_CURRENT_USER\Software\Microsoft\Internet Explorer\Download "CheckExeSignatures" = 'no'
- HKEY_CURRENT_USER\Software\Microsoft\Internet Explorer\Main "Use FormSuggest" = 'yes'
Share this information with other people: